
Aquí os lo dejo! Espero que os sirva!
Some friends asked me to post a little tutorial of how I work in Adobe Ilustrator.
I leave it here! I hope it's useful!
 paso uno.
boceto guarruno
herramienta: pincel
personajes agrupados por separado
y con un tono de azul distinto, para que no se peguen.
Step One.
Dirty sketch.
tool: brush
the characters are grouped separately, with a different blue, so they don stick to each other.
 paso dos
herramienta: pincel.
detallo un poco con el pincel más fino y más oscuro que el anterior, en un grupo distinto.
asi los dos grupos de primeras lineas y segundas no se pegarán.
Step Two.
tool: brush
I detail a bit more with a smaller brush in a darker color, in a different group
so they (again) don't stick
 paso 3.
más ajustes.
la documentación es gratis. tenedla cerca!!!
Step Three.
More details
information pics are free, so have them near!!
 paso 4
cuántos más detalles dibujados, mejor.
asi nos quitamos de "experimentar" cuado demos el color, que es el siguiente paso.
Step four.
The more details you draw now, the better.
So i do less "experiments" when i do the color parts, that is next step.
 paso 5
con la pluma en modo contorno, perfilamos la silueta, desde las cosas que van a estar más atrás a las que están mas alante (poner musica de bricomania)
no pasa nada si os equivocais, porque con el objeto seleccionado podeis adelantarlo (ctrl 0) o alejarlo (ctrl9)
los detallicos y los rasgos ajustados ya se los pondre más tarde
recomiendo agrupar el cuerpo por partes, la cageza, el torso, los pantalones, para que no haya lios a la hora de colocarlo todo.
en ilustrator hay que ser un poco ordenado
al lado está la cabeza tal y como quedaría en relleno, sin contornos.
Step five.
With the quill in "outline mode" I shape the silhouette, firstly the ones on the back, and then the ones in the front.
It doesn´t matter if you don't do it in the correct order, you can always move objects to the front (ctrl+0) or to tha back (ctrl+9)
I leave for later the face feautures and the details.
I reccomend to group the different parts of the body sepparately, the gead, the torso, the trousers... so there is no chaos when you vant to put everything in order.
In Ilustrator you have to be a bit tidy.
just next to the head is the head in otlines.
 con la herramienta flecha blanca (A)
retoco los bordes de la cara buscando el parecido.
los ojos más redondos, la expresión espabilada.
lo que mola del ilustrator es que puedes mover y remover hasta que algo está definitivamente en su sitio
y si no existe un deshacer accion (ctrl z) casi infinito.
with the white arrow (A)
I retouch the face borders looking for the alikeness.
the eyes have to be rounder, and an awake expression.
What us very cool abot ilustrator is that you cane move, and remove untill something is in its right place.
and if not, you have an "delete action" (ctl+z) almost to the infinite.
 para las ropas, que son más blancas y se pegan al fondo, mejor poner un fondo oscuro detras.
^_^
sólo pongo lineas en las masas de color plano, más oscuras que el color sobre el que están. son masas tambien, no contornos, asi se le da un aire más "entintado" con distinto grosor de linea.
For the clothes, that are whiter and get confused with the background, it's better to put a dark color behind. ^____^
I just use lines in the plain color masses, always darker than them.
they are masses to, not outlines, so they look more "ink like", with different thickness.

 más detallicos, sombricas, cosinas, y demás diminutivos flanderianos.
cuando se meten sombras, siempre puedes jugar con las opacidades, para no tener que ir por
piezas.
More details and little things, and shadows.
When you do the shadows you can play with the opacities, sou you dont hace to do it in each part.
 los cuadraditos y circulos que se ven en el lateral son los colores originales oscuro y claro, y el degradado.
no me gusta abusar de los degradados pero siempre es recurrente para dar "un ligero tono" de claroscuro sin recurrir a los planos cortantes de color.
The little squares and circles you see in the sides are the original light and dark colors, and the gradient.
I don't like to abuse of the gradients but they're always recurrent to give "a little tone" of lightandshade without doing sharp color shadows.
 detallicos!!
que siempre hacen que todo quede más bonico.
details!!
they alwais make everything prettier.
 nymeria!!
Nymeria!!

 el cuerpo de nymeria llevará un degradado, asi que para poder trabajar bién (el degradado no tiene opción de contorno) duplico el objeto (arrastrando mientras pulso ALT) y lo dejo ahi puestecico.
gracias a la opción GUIAS INTELIGENTES (ctrl U) después solo tendré que agarrar el objeto desde un ancla y colocarla exáctamente donde su homóloga, que se nos iluminara con un pequeño texto que pondra escrito ANCLA.
asin de faccile
Nymeria's body will hace a gradient, so, in order to work ok, (the gradient hasn't got the outline option) I duplicate the object (pressing ALT while I drag it) and I leave it right there.
Later, Thank's to the option INTELIGENT GUIDES (ctrl U), i vill just have to grab the object from one of the anchors and make it coincide with it's equivalent, that will illuminate in blue with a little text that sais ANCHOR.
it's that easy.
 detallicoss
la cola también lleva un degradado, coincidiendo con el cuerpo, para que separen mejor los planos.
la punta de la cola es el color del morro pero con una leve transparencia, para que pille del degradado.
la herramienta de degradad del CS5 es una maravilla, tienes una barra que se puede rotar, alargar, dar vueltas, y si te descuidas te hace la cena.
the tail has a gradient too, coinciding with the color of the body, so the levels separate.
The point of the tail is the same color as the snout's but with a bit of transparency, so it gets a bit of the gradient below it.
The gradient toll of the Cs5 is great, you have a bar you can move, rotate, make larger or smaler, and if you dont look at her, she even makes you dinner.
 un pechico blanco transparente, le hacemos un poco de liposucción, le colocamos la otra pata detrás, unos pelicos sueltos, sin abusar, y HABEMUS NYMERIA!
a transparent-white chest, a bit of a liposuction, we put the other paw back, some hairs here and there without abusing, and HABEMUS NYMERIA!!
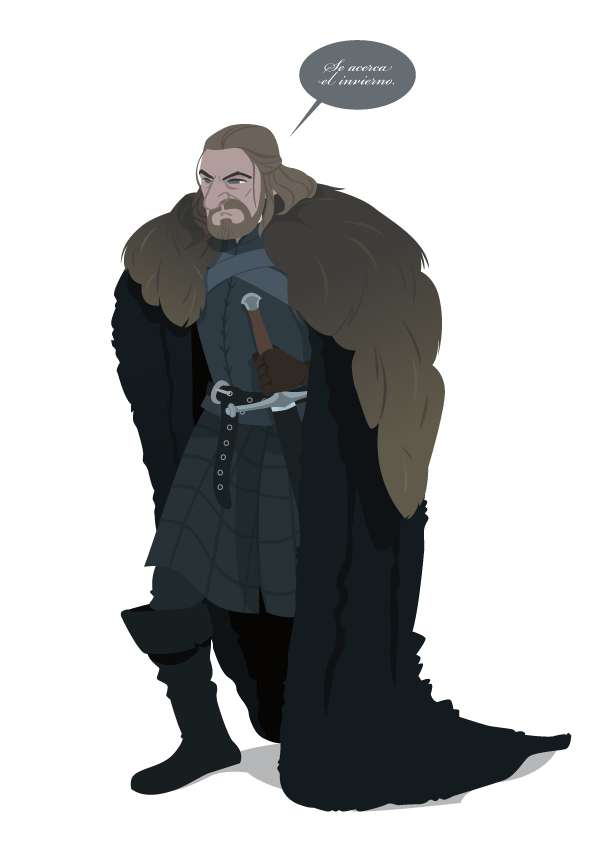
 una sombra, unos bocadillos, unas caligráficas...
C'EST FINI !!!!
A shadow on the floor, a pair of baloons, some caligraphics...
C'EST FINI !!!!
